
Epoxy Floor Yellowing: Causes, Fixes, and Prevention
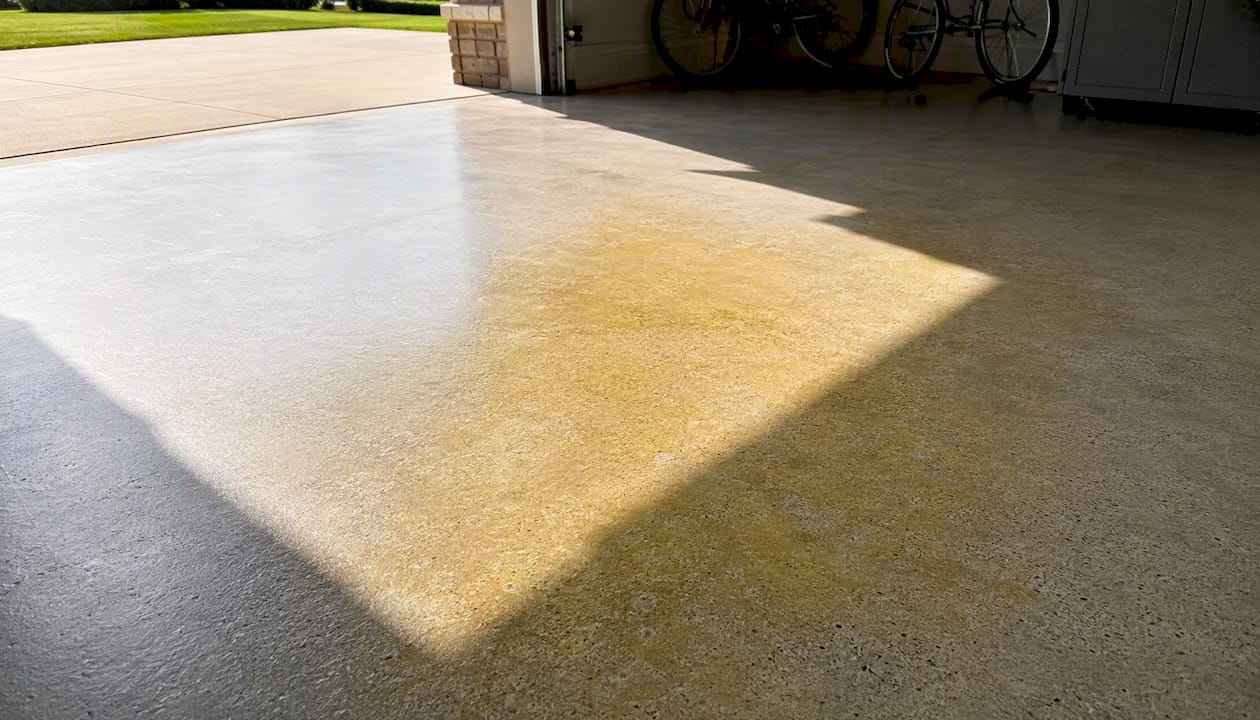
Standard epoxy floors can and do yellow, and the discoloration is usually permanent once it sets into the polymer. Here’s what to do right now, before you spend money on the wrong fix:
- Clean the floor with a pH-neutral cleaner and let it dry completely.
- Inspect under natural daylight to see whether the amber tint is even across the slab or concentrated in spots.
- Plan your repair path based on what you find: surface grime may clean off, but true polymer yellowing needs abrasion and recoating.
If the floor is in a high-visibility space like a showroom garage or a finished basement, or if you’re still inside a contractor warranty window, act within the next few weeks. A floor that’s only lightly ambered is far easier and cheaper to address than one that’s been yellowing for two or three years.
Key Takeaways
Epoxy floor yellowing is a permanent polymer change once it sets in, but the right topcoat choice at installation or recoat prevents it for a decade or more.
| Point | Details |
|---|---|
| Yellowing is usually permanent | Photo-oxidation forms chromophores inside the resin; cleaning and polishing cannot reverse it. |
| Pattern tells you the cause | Even amber near windows means UV damage; spotty rings mean slab contamination; cloudy areas mean moisture or amine blush. |
| Fix requires abrasion and recoat | Scuff sand or diamond grind to 50–60 grit, vacuum, then apply a UV-stable polyaspartic or aliphatic topcoat. |
| Prevention beats repair | A polyaspartic topcoat over an epoxy base commonly delivers 10+ years of color stability indoors, and bare aromatic epoxy generally lasts 1–3 years before visible yellowing. |
| Alldaypowerwashing handles the hard part | For Colorado Springs and Denver homeowners, Alldaypowerwashing offers professional diamond grinding and UV-stable topcoat application with same-week quotes. |
Table of Contents
- Why epoxy floors turn yellow: the chemistry behind the color change
- How to diagnose your floor’s discoloration before you spend a dime
- Step-by-step DIY repair: clean, abrade, and recoat safely
- When you should call a professional instead
- How to stop future yellowing: product choices and site decisions
- Routine care that slows yellowing over time
- What to expect for time and money on a repair or recoat
- How lighting conditions affect how yellow your floor looks
- Aliphatic vs. aromatic epoxy: how long each actually lasts
- How your location affects how fast epoxy yellows
- The part most homeowners get wrong about epoxy yellowing
- Get a same-week quote for your yellowed epoxy floor in Colorado
- Useful sources for deeper reading
Why epoxy floors turn yellow: the chemistry behind the color change
Yellowing is almost never a surface stain you can scrub away. It’s a chemical change inside the resin itself.
The primary driver is photo-oxidation: UV light triggers radical oxidation reactions that form chromophores, specifically carbonyl groups and conjugated double-bond structures, which absorb visible light and produce that amber or yellow cast. The same study found that air isolation outperforms antioxidant additives at slowing this process, which is why a sealed topcoat system performs better than a bare epoxy layer. Vinyl ester resins show meaningfully better yellowing resistance than standard epoxy in the same aging tests.
Beyond UV, several other mechanisms push a floor toward amber faster than most homeowners expect.
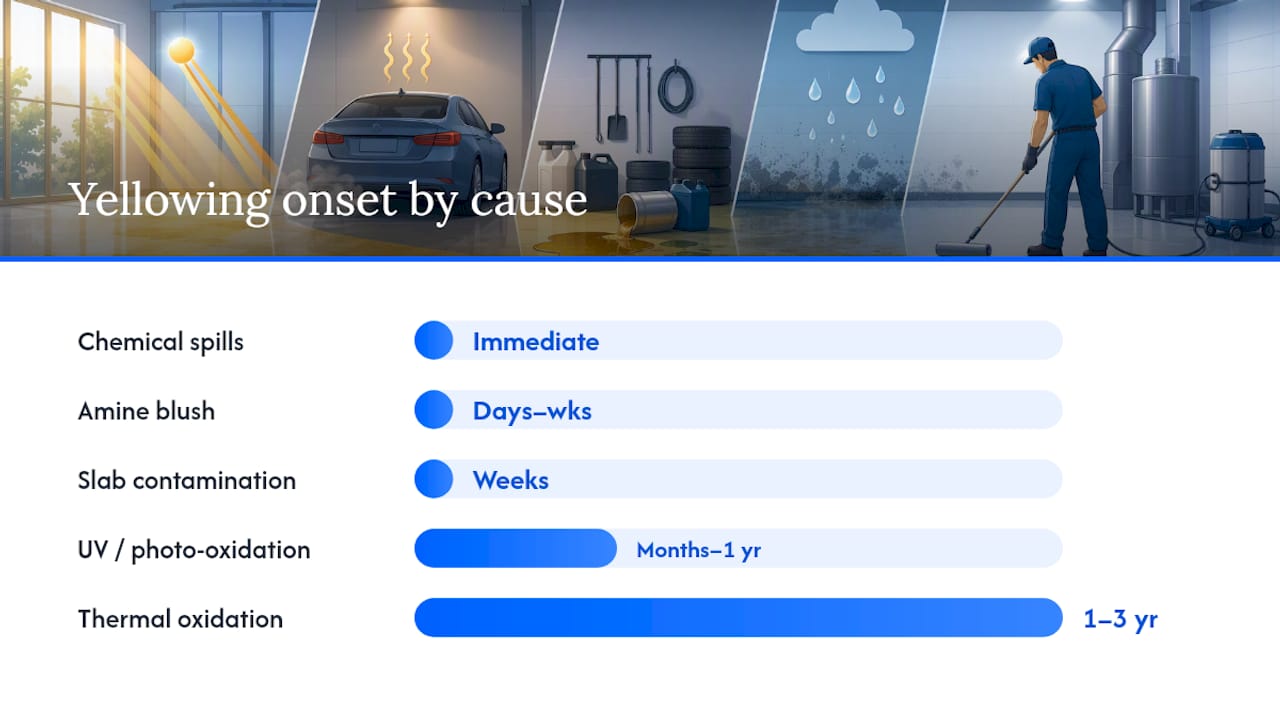
| Cause | Speed of onset | Typical severity |
|---|---|---|
| UV / photo-oxidation (aromatic epoxy) | Several months to about a year in sunny garages | Moderate to severe; permanent |
| Thermal oxidation (heat from sun, radiant slabs) | 1–3 years | Moderate; accelerates UV damage |
| Aromatic (BPA-based) epoxy chemistry | Inherent; starts on first UV exposure | Permanent without topcoat |
| Amine blush / moisture during cure | Days to weeks after application | Mild to moderate; sometimes reversible |
| Slab contamination (oil, coolant) | Telegraphs within weeks of coating | Spotty; requires slab-level remediation |
| Chemical spills (acids, solvents) | Immediate to weeks | Localized; often permanent |
| Age / natural oxidation (no UV) | 3–7 years indoors | Mild; slows with topcoat |
The chemistry of the resin matters enormously. Aromatic epoxies — the type used in most DIY kits and big-box store products — contain benzene ring structures that absorb UV energy and oxidize readily. Aliphatic epoxies and polyaspartic coatings lack those aromatic rings, which is why they hold their color far longer.
Timeline context worth knowing: DIY and big-box aromatic systems typically show visible ambering in 6–18 months in a sun-exposed garage. A 100% solids epoxy without a UV-stable topcoat usually lasts 1–3 years before noticeable yellowing. An epoxy base paired with a polyaspartic topcoat commonly delivers 10+ years of color stability indoors.
Thermal aging and improper application conditions — high humidity, a cold slab, incorrect mix ratios — accelerate discoloration and clouding on top of whatever UV damage is already occurring.
How to diagnose your floor’s discoloration before you spend a dime
The pattern of the discoloration tells you most of what you need to know. Run these three tests in sequence before buying anything.
- The cleaning test. Scrub a small section with a pH-neutral cleaner and a stiff brush. If the color lifts, you’re dealing with surface grime or a light haze, not polymer yellowing.
- The solvent test. Dampen a white rag with isopropyl alcohol (91% or higher) and wipe a discolored area. If color transfers to the rag, it’s a surface contaminant. If nothing transfers and the amber remains, the yellowing is inside the resin.
- The light-pattern check. Take photos under natural daylight and under artificial light. Even, all-over ambering that’s worst near windows or doors points to UV/photo-oxidation. Spotty rings or dark patches in the middle of the floor point elsewhere.
Map what you see to the likely cause:
- Even amber tint, strongest near windows or garage door openings → UV/photo-oxidation; needs abrasion and a UV-stable topcoat.
- Spotty dark rings or patches → slab contamination from oil, coolant, or rust telegraphing through the coating; may need slab-level cleaning or grinding before recoating. For persistent rust spots on concrete, the removal process is similar to treating rust on concrete driveways.
- Cloudy or whitish areas → moisture trapped during cure or amine blush; sometimes polishable, sometimes requires recoating.
- Localized discoloration near a drain or spill zone → chemical exposure; assess depth before recoating.
Safety note: Use isopropyl alcohol only in a ventilated space. Keep it away from open flames. Wear nitrile gloves and eye protection. Never use acetone or MEK as a first test solvent on a floor you plan to keep, since they can soften the coating.
Step-by-step DIY repair: clean, abrade, and recoat safely
A well-bonded floor with yellowing as its only problem is usually a good DIY candidate, provided you have the right equipment and a ventilated space. Peeling, soft spots, or widespread delamination are different problems that need professional assessment first.
Tools and PPE you’ll need:
- Orbital floor sander or angle grinder with a diamond cup wheel (for larger areas)
- 50–60 grit abrasive pads or equivalent diamond tooling
- Shop vacuum with a HEPA filter
- Respirator rated for both dust and organic vapors (N95 minimum for dust; OV/P100 cartridge if using solvent-based products)
- Nitrile gloves and safety glasses
- Stiff-bristle brush and pH-neutral degreaser
- UV-stable topcoat: polyaspartic or aliphatic polyurethane
The repair sequence:
- Evaluate adhesion. Press a strip of duct tape firmly onto the floor, then pull it fast. If the coating peels with the tape, the bond is compromised and recoating over it will fail. Stop here and call a professional.
- Deep clean and degrease. Scrub the entire surface with a pH-neutral degreaser. For oil spots, a dedicated degreasing approach helps lift contamination before abrasion. Rinse thoroughly and let the slab dry for at least 24 hours.
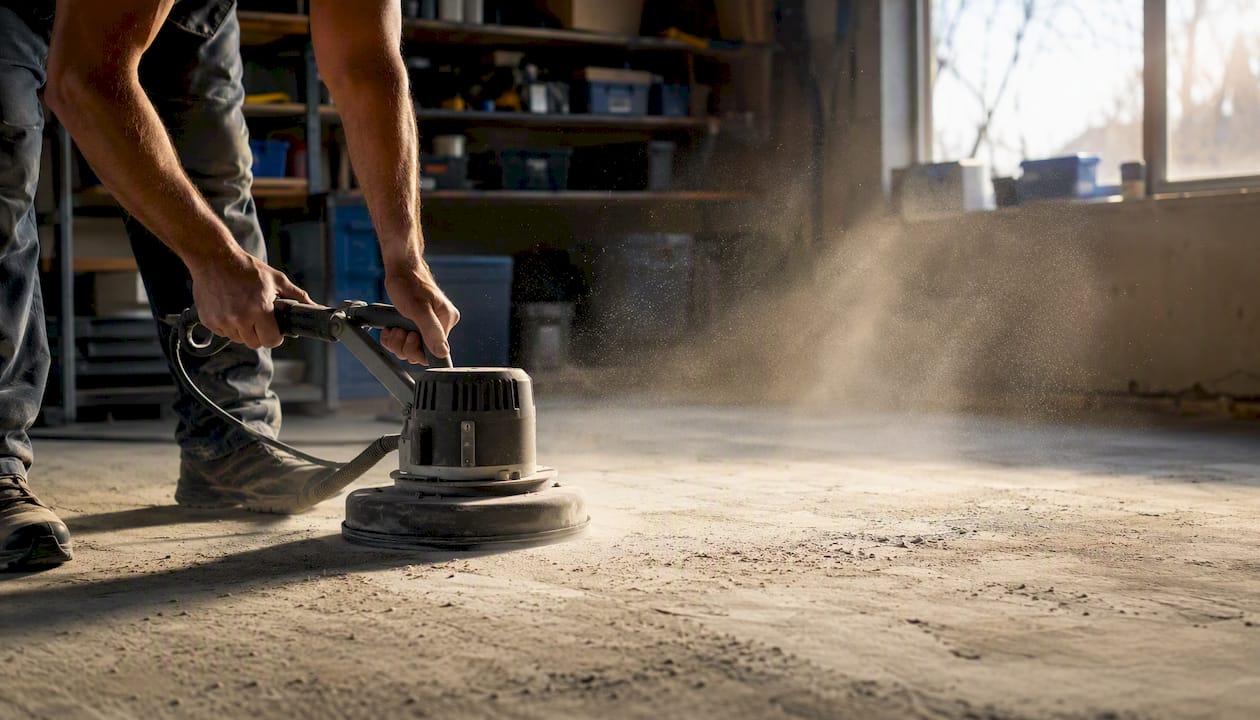
- Mechanical abrasion. Scuff sand or diamond grind the entire surface with 50–60 grit equivalent tooling. The goal is a uniform dull profile with no shiny patches. Shiny areas won’t bond to the new coat.
- Vacuum and profile check. Use the HEPA shop vac to remove all dust. Run your hand across the surface: it should feel uniformly rough, like fine sandpaper. Wipe with a tack cloth before coating.
- Apply the UV-stable topcoat. Mix and apply a polyaspartic or aliphatic polyurethane topcoat per the manufacturer’s instructions. Both product types resist UV-driven yellowing far better than standard aromatic epoxy. Proper subfloor preparation at this stage is what separates a coating that lasts from one that fails in two years.
- Cure and test. Foot traffic is typically safe within 24 hours for polyaspartic; vehicle traffic usually requires 72 hours minimum. Check the product spec sheet for your exact product.
Safety notes: Sanding epoxy generates fine dust that contains residual amine hardeners. Wear your respirator from the moment you start sanding until the floor is vacuumed clean. Dispose of sanding dust in a sealed bag per your local hazardous-waste guidelines. Work with garage doors fully open and a fan exhausting air outward.
DIY vs. pro decision rule: If the area is larger than a two-car garage, the floor has visible moisture staining, or you don’t have access to a diamond grinder, a professional will do the job faster and with better results.
When you should call a professional instead
Some problems look like yellowing but are actually signs of a failing system. Recoating over them without fixing the root cause wastes money.
Call a professional when you see any of these:
- Peeling or flaking anywhere on the floor, not just at edges.
- Soft or tacky areas that don’t harden with time (often a mix-ratio problem or moisture issue).
- Blistering or bubbling under the coating surface.
- Widespread delamination where the coating separates from the slab in sheets.
- Evidence of moisture vapor emission: white efflorescence, persistent cloudiness, or a floor that feels damp to the touch in humid weather.
- Deep slab contamination from oil or coolant that has soaked into the concrete over years.
A professional brings tools and processes that aren’t practical for DIY: calcium chloride moisture vapor emission testing, industrial diamond grinders that remove the full coating layer in one pass, and access to industrial-grade polyaspartic topcoats with manufacturer warranties on color change. Fast-cure polyaspartic systems used commercially can return a floor to service in hours rather than days.
When getting quotes, ask every contractor these three questions:
- What is the chemistry of the topcoat you’re applying — aromatic epoxy, aliphatic, or polyaspartic?
- What surface prep steps are included — hand sanding, shot blasting, or diamond grinding?
- Does your warranty cover color change or yellowing, and for how long?
Those three answers will tell you immediately whether you’re comparing equivalent systems or getting a low-bid aromatic recoat that will yellow again in 18 months.
How to stop future yellowing: product choices and site decisions
The single most effective prevention is specifying a UV-stable topcoat, either polyaspartic or aliphatic, as part of the original coating system. Adding it after the fact works too, but building it into the spec from day one is cheaper and more durable. Contractor guides consistently recommend testing sun exposure before choosing a product and writing the UV-stable topcoat into the system rather than treating it as an optional upgrade.
| Coating type | UV resistance | Color stability | Typical lifespan (indoor, sun-exposed) |
|---|---|---|---|
| Standard aromatic epoxy | Low | Yellows within a few years | Several years before visible ambering |
| Aliphatic epoxy | High | Holds color well | Several years with proper prep |
| Polyaspartic topcoat | Very high | Excellent; long-lasting color stability | Commonly provides over a decade of good appearance in most indoor environments |
| Vinyl ester | High | Better than aromatic epoxy in lab tests | Typically longer-lasting than aromatic; less common in residential |
Application best practices that directly reduce yellowing risk:
- Test slab moisture before coating. A calcium chloride test or relative humidity probe catches vapor emission problems that cause amine blush and clouding.
- Apply within the manufacturer’s temperature and humidity window. Most epoxies require a slab temperature above 50°F and relative humidity below 85%.
- Get mix ratios exactly right. Off-ratio mixing leaves unreacted amines that oxidize and yellow faster.
- Degrease and profile the slab before any coat. Residual oil telegraphs through coatings within weeks.
- Seal any concrete cracks before coating to prevent moisture migration from below.
Pro Tip: If your garage faces south or west and gets direct afternoon sun, choose a mid-tone or darker flake broadcast for the base coat. Flake finishes scatter light and hide early ambering far better than a solid light-gray or white base. Window tint film on garage door windows can also cut UV transmission significantly without blocking natural light.
Routine care that slows yellowing over time
Regular cleaning and prompt spill management slow visible yellowing and surface degradation, even on floors that already have a UV-stable topcoat. The goal is to keep the surface free of chemicals that accelerate oxidation and to catch early signs of wear before they become repair projects.
Do:
- Clean weekly or biweekly with a pH-neutral floor cleaner diluted per label directions. Products like Simple Green diluted 1:10 or a dedicated epoxy floor cleaner work well.
- Blot oil and chemical spills immediately. The longer a solvent or acid sits, the deeper it penetrates.
- Rinse the floor after winter salt and ice-melt exposure. Chloride salts accelerate surface degradation and can work into micro-cracks.
- Inspect the floor each spring and fall for new soft spots, edge lifting, or color changes.
Don’t:
- Use high-acid cleaners (vinegar, citrus-based degreasers at full strength, or muriatic acid) on a coated floor. They etch the surface and accelerate oxidation.
- Use high-alkali cleaners like undiluted bleach or sodium hydroxide solutions. They can soften the resin over time.
- Drag metal objects or use steel-bristle brushes that scratch the topcoat and expose the base layer to UV.
- Use a steam cleaner. The heat and moisture combination can soften the coating and introduce moisture into micro-cracks.
For stain removal: oil spots respond to a degreaser and a stiff nylon brush. Rust stains on the concrete visible through a worn coating need a dedicated rust remover before any recoat. Polishing with a plastic polishing compound and a foam pad can restore surface clarity after light scratching, but as noted earlier, it won’t touch polymer-level yellowing.
When cleaning makes the floor look better but the amber returns within a few days of drying, that’s the signal that you’re past the maintenance phase and into repair territory.
What to expect for time and money on a repair or recoat
DIY recoating a small garage is lower in out-of-pocket cost but slower per square foot when you factor in equipment rental, prep time, and cure windows. Professional jobs cost more upfront but buy speed, better prep equipment, and a warranty. For Colorado homeowners, local labor rates and material costs vary by project scope, so getting a line-item quote is the most reliable way to budget.
Typical timeline for a DIY recoat:
- Day 1: Deep clean and degrease (2–4 hours), let dry overnight.
- Day 2: Abrasion, vacuuming, and profile check (2–4 hours for a one-car garage).
- Day 2 (afternoon): Apply polyaspartic topcoat.
- Day 3: Foot traffic safe (24 hours after application for most polyaspartic products).
- Day 5: Vehicle traffic safe (72 hours minimum for most products; check your spec sheet).
Epoxy topcoats cure more slowly: most require 24 hours before foot traffic and 5–7 days before vehicle traffic in normal conditions.
Cost drivers to confirm in any estimate:
- Square footage of the area being prepped and coated.
- Whether diamond grinding or shot blasting is included (adds cost but dramatically improves adhesion and longevity).
- Product chemistry: polyaspartic costs more than aromatic epoxy but lasts significantly longer.
- Number of coats specified.
- Geographic labor rates (Colorado Springs and Denver metro rates differ from national averages).
- Warranty terms, specifically whether color change is covered.
How lighting conditions affect how yellow your floor looks
The same floor can look dramatically different under different light sources, and understanding this saves homeowners from recoating a floor that’s actually in acceptable condition.
Natural daylight, especially direct sunlight through south-facing windows, reveals amber tones most accurately. Warm-white LED or incandescent lighting (color temperatures around 2700–3000K) adds yellow cast to everything it illuminates, making a lightly ambered floor look worse than it is. Cool-white LEDs (5000–6500K) are closer to daylight and give a more accurate read of the floor’s true color.
Practical adjustments that reduce perceived yellowing without touching the floor:
- Switch garage lighting to cool-white LEDs (5000K or higher). The difference on a lightly ambered floor is often striking.
- Install UV-blocking window film on garage door windows and any side windows. This cuts the UV that drives photo-oxidation and also reduces the warm light that makes yellowing more visible.
- Time garage door openings to limit direct afternoon sun exposure on west-facing garages. Even an hour less of direct sun per day adds up over years.
None of these fixes the underlying chemistry, but they meaningfully slow future yellowing and make the current floor more livable while you plan a proper repair.
Aliphatic vs. aromatic epoxy: how long each actually lasts
The lifespan difference between aliphatic and aromatic epoxy formulations is substantial, and it comes down entirely to molecular structure.
Aromatic epoxies contain benzene rings that absorb UV energy efficiently. That absorption triggers the radical oxidation chain that forms chromophores, and once that process starts, it’s self-reinforcing. A bare aromatic epoxy floor in a sun-exposed garage typically shows visible yellowing within 6–18 months for a DIY kit and 1–3 years for a higher-quality 100% solids system. The polymer aging research confirms that vinyl ester resins, which share some structural similarities with aliphatic systems, outperform standard epoxy in both UV and thermal aging tests.
Aliphatic epoxies and polyaspartic coatings lack those aromatic rings. UV energy passes through without triggering the same oxidation cascade, which is why a polyaspartic topcoat over an epoxy base commonly delivers 10+ years of color stability in indoor environments. The tradeoff is cost: aliphatic and polyaspartic products cost more per gallon than aromatic systems, and they require careful surface prep to bond correctly.
For a garage floor that gets any direct sunlight, the math is simple. Spending more on a UV-stable topcoat at installation is cheaper than recoating an aromatic floor every two to three years. The best epoxy garage floor coatings for long-term color stability all use either aliphatic chemistry or a polyaspartic topcoat layer.
How your location affects how fast epoxy yellows
Geography matters more than most product guides acknowledge. Two identical floors coated with the same aromatic epoxy system can yellow at very different rates depending on where they sit.
High UV index regions (the Southwest, Colorado’s Front Range, and high-altitude locations generally) accelerate photo-oxidation faster than coastal or northern climates. Colorado Springs and Denver sit at elevations where UV radiation is measurably higher than at sea level, which means aromatic epoxy floors in Colorado garages face more aggressive yellowing conditions than the same floor in, say, Seattle.
Temperature swings matter too. Thermal cycling between cold nights and warm days, common throughout Colorado’s continental climate, stresses the coating at a molecular level. Repeated expansion and contraction opens micro-cracks that allow oxygen and moisture to penetrate, accelerating both oxidation and amine blush.
Humidity plays a dual role. High humidity during application causes amine blush and clouding. But very low humidity, common in Colorado’s semi-arid climate, can cause some coatings to cure too quickly, trapping unreacted components that later oxidize. Applying epoxy in the recommended humidity window (typically 40–85% relative humidity) is especially important at altitude.
Seasonal salt exposure in snow-belt regions adds a chemical stressor that coastal or southern climates don’t face. Chloride salts from ice melt work into micro-cracks and accelerate surface degradation, which is why spring cleaning and inspection matter more in Colorado than in Arizona.
The practical takeaway for Colorado homeowners: the UV and thermal conditions here make a UV-stable topcoat less optional than it might seem in a lower-elevation, lower-UV market. An aromatic epoxy that lasts three years in a shaded Midwest garage may amber in under a year in a south-facing Colorado Springs garage.
The part most homeowners get wrong about epoxy yellowing
Most of the advice online treats epoxy yellowing as a product quality problem. Buy a better kit, use a name brand, apply two coats instead of one. That framing misses the actual issue.
The real problem is that aromatic epoxy chemistry is fundamentally incompatible with sun exposure, regardless of brand or price point. A $300 DIY kit and a $3-per-square-foot professional aromatic epoxy will both yellow in a sun-exposed garage. The chemistry is the same. What changes the outcome is whether a UV-stable barrier coat is part of the system.
The second thing homeowners consistently underestimate is surface prep. A polyaspartic topcoat applied over a poorly abraded or contaminated surface will peel within months, and when it peels, it takes the yellowing problem with it but adds a delamination problem on top. The prep is the job. The coating is almost secondary.
For Colorado homeowners specifically, the high UV index and thermal cycling conditions here make the UV-stable topcoat a necessity rather than a premium upgrade. A floor that might last one to three years in a shaded garage in the Midwest may amber in under a year in a south-facing Colorado Springs garage with afternoon sun.
If you’re planning a recoat, spend your budget on diamond grinding and a quality polyaspartic topcoat, not on a thicker aromatic base coat. That’s the decision that determines whether you’re back here in two years or in ten.
Get a same-week quote for your yellowed epoxy floor in Colorado
Yellowed floors in Colorado Springs and Denver face tougher conditions than most product guides account for. The high UV index and temperature swings here mean that a DIY aromatic recoat without a UV-stable topcoat is likely to amber again within a season or two.
Alldaypowerwashing provides professional epoxy floor inspections, moisture testing, diamond grinding, and application of UV-stable topcoats for residential and commercial garages across Colorado Springs and the Denver metro area. The difference from a DIY recoat is the prep: commercial-grade diamond grinding removes the full discolored layer cleanly, and the industrial polyaspartic topcoats used on professional jobs carry manufacturer warranties on color change that consumer products don’t offer.
Before you call, pull together a few photos of the floor in natural daylight, note the approximate square footage, and think about which direction your garage faces and how much direct sun it gets. That information lets the crew give you an accurate same-week quote without a guessing game on materials. Request your quote here or view the full epoxy coating services to see what’s included.
Useful sources for deeper reading
- Yellowing mechanisms of epoxy and vinyl ester resins under thermal, UV and natural aging conditions and protection methods — ScienceDirect
- EPOXYSHIELD® Garage Floor Coating Yellowing – Rust-Oleum
- Why Epoxy Floors Turn Yellow (And How to Prevent It) — Specialty Concrete Coatings
- Garage floor coating discoloration causes and prevention — GarageFloorLab
- Does Epoxy Floor Yellow? The Honest Answer & Prevention — Artepoxy Designs
- Epoxy yellowing — an industrial guide — INCURE INC.
- Polish and Smooth Epoxy Resin: Sanding & Finishing Guide — TotalBoat